Sunny Hobart

I’d love to share a recipe with you today but I’m currently stuck in Hobart airport waiting on my tiger flight which is one and a half hours late.

We visited sunny Hobart for a friend’s wedding at their gorgeous property in the Huon valley. After a short service we picnicked in the sun. Ok we all got a little too much sun and will be sorry tomorrow.

The groom’s father (an ex army cook) prepared a spit roast of lamb, chicken, turkey and beef and a cavalcade of helpers kept us supplied with salads and drinks.

It was beautiful day for two beautiful people.

That said I can’t wait to get on this plane and get home.

Posted in nablopomo | Tagged | Leave a comment

Friday Five


I love Friend Friday over on twitter and of course bloggers have been doing the same sort of thing for years. I’d like to share with you some of the posts that caught my eye though the feeds this week.

Magazine steals recipe from blogger and says you should be happy we did it! Undoubtedly this weeks biggest scandal in the food blogging world, online and print magazine Cooksource shows how not to make friends and influence people. Of course internet justice is swift and snarky.

I Do like green eggs and ham! Fantastic DR Seuess themed dessert table by kelly of paper stories and featured on Amy atlas events. I know there is a dessert table in my future!

Baking Bites Ad Hoc Choc Chip Cookies Oh these sound so delicious! I can not wait to make them!

Still Life Style gave some hints on how to create textured backgrounds.

And still on the photography theme Sweet Apolita shares her tips for better food photography.

Posted in friday five | Tagged , , , , , , , , , | Leave a comment

I wanna see your Pitta!


photo by robert.


No it’s not the misheard lyrics of a Katy Perry song it’s a flatbread of middle eastern origin which took over my kitchen recently.

The pitta breads you buy at the supermarket are wafer thin and often tasteless little bits of cardboard. I wanted to try pitas ever since I saw an image of them puffed up like footballs in the oven, they looked amazing and I’d never tasted fresh pitta!

The recipe below is adapted from Dan Lepard’s recipe for the Cooks Book.

A couple of caveats before you begin. You need a hot oven & a baking stone – use an oven thermometer, if your oven doesn’t get to 230 degrees Celsius then don’t attempt this recipe. You’ll need a few hours to get this started. Also I have reduced the sugar from the original recipe by 25% as we found our finished pitta too sweet.

Pitta Pitta!
What you’ll need:
For the biga:
1/2 packet of active dry yeast
125ml lukewarm water
100 grams strong flour (eg. tipo 00)

For the dough:
195ml lukewarm water
200g plain flour
250g strong white flour
30g castor sugar
7g salt

How to do it:

The Biga:

  1. Whisk the yeast and water together then add flour and mix until smooth.
  2. Leave in a warm room for at least 1 1/2 hours.

For the Dough

  1. Mix the water with the ferment then in a large bowl mix in both flours, sugar & salt until combined and soft & sticky.
  2. Cover with plastic wrap & rest for 10 minutes.
  3. On an oiled surface knead the dough with oiled hands until smooth and silky. Use a bit more oil if necessary but don’t saturate.
  4. Rest for 30 minutes
  5. Give the dough another short knead (12 passes)
  6. Rest for 3o minutes
  7. Preheat oven & stone to 230 degrees Celsius
  8. Divide the dough into 8 eaqual peices, make into round balls and rest uncovered for 15 minutes
  9. On a floured board roll your balls until they are about 4mm thick then let them sit for about 5 minutes.
  10. Bake one pitta at a time in the hottest part of the oven, they take about 5 minutes and they should puff up like footballs! They do not colour a lot so if they are getting to much colour then reduce your heat by a few degrees.
  11. Cool your pitas under a cloth and cook your next one when the oven is the correct temperature.

Enjoy your fresh pittas with hummus or tzatziki or make your own pan roasted  kebabs with Tes’s great recipe.


Posted in Uncategorized | 1 Comment

A little Lemon Curd


I love Lemon Curd, but most recipes are of the opinion that more is better!

Sometimes you just want a little, a dribble for some crepes, a dollop for some lemon cakes. So here is the recipe for just a little lemon curd. No preserving instructions included, I’m sure you can get through this amount in a day or two.

A little Lemon Curd
Adapted from the Basic lemon Curd recipe at taste.com.au

What you’ll need:
1 large lemon
75 grams Castor Sugar (superfine sugar)
1 large egg
30 grams of butter

How to do it:

  1. Choose a saucepan and medium heatproof bowl which fit snuggly together leaving at least 8cm free in the bottom of the saucepan.
  2. Fill saucepan with about 5cm of water cover with a lid and bring to the boil over a medium heat.
  3. Remove zest from lemon, (I can’t live without my microplane!) and juice.
  4. Beat your egg in a separate bowl and then strain to remove any difficult proteins.(you can break the difficult bits up with a spatula by pushing them through the sieve.)
  5. In your bowl mix 40mls of the juice and your sugar. Add eggs and stir.
  6. Reduce the saucepan to a low simmer and place your bowl on top. Be careful of steam and make sure the bowl does not touch the water!
  7. Stir the mixture over the heat until it is thick enough to coat the back of a wooden spoon, this will take about 10-15 minutes depending on what your stovetop’s low simmer is.
  8. Take the  bowl from the heat and place on a damp towel to stop the cooking.
  9. Stir in your butter and about 1 teaspoon of the grated zest of your lemon (more or less to taste)

    Enjoy warm for a decadent experience or use when cooled and it holds it’s shape better.


Posted in nablopomo, Sweet Recipes | Tagged , , , | Leave a comment

Make your own marinated fetta

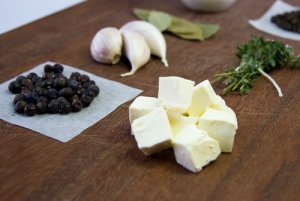
marinated fettaWell it’s Melbourne cup day here in Australia, which is the (horse) race that stops a nation. People don elaborate headgear and gather for parties and picnics. One of my favourite party nibbles is Luke Mangan’s Persian Fetta Tarts, but persian fetta is expensive. So before I share my version of Luke’s recipe in the coming days let me share with you how to make your own marinated fetta.

Creaminess to the 10th degree with flavours of juniper, bay, thyme and garlic, marinated fetta has a little bit of the Mediterranean in each mouthful.

Unfortunately in Australia it comes at a cost, between $6 and $12 for 150 -200grams! It doesn’t have to be this way! People of Australia you can make your own marinated fetta in minutes at a fraction of the cost!
Marinated Fetta
What you’ll need;
150 – 200 grams of fetta (Smooth creamy styles work best – I’m partial to South Cape Tasmanian)
1 or 2 dried bay leaves
1 clove of garlic
4-6 sprigs of fresh thyme (I like to use a mix of normal thyme and lemon thyme)
6 black peppercons
6 driedJuniper Berries (Essential ingredient stores around Australia stock Juniper berries)
Canola oil to cover (You can substitute another oil here just don’t use olive oil or anything else that solidifies in the fridge)
Airtight container big enough to hold everything
How to do it;
1. Wash & dry your container in hot water and detergent.
2. Cut the fetta into cubes no smaller than 2cm x 2cm x 2cm
3. Place the garlic in the bottom of your container then layer in the fetta, bay leaves, thyme, juniper berries & peppercorns.
4. Slowly fill container with oil until all fetta is under the level of the oil.
5. Refrigerate for at least 4 days before using.
Fetta will keep in the fridge in covered by oil for quite a long time, it never lasts in our house, but I take the “use by” date from the fetta as my guide. (just mark it on your container)
Tips:
– Boccocini containers are often a good size for this project.
– Adjust the flavours to suit your tastes but be careful with the garlic, a little goes a LONG way!!
– Delicious served with a drizzle of rocket pesto on crostini
– Use left over oil to brush over vegetables or meat for chargilling.
– Why not find some pretty jars and give as a lovely homemade hostess gift?

I hope you enjoy my marinated fetta, let me know what your favourite uses for marinated fetta are!

Posted in Savoury Recipes | Tagged , , , , , , , , | 3 Comments

30 in 30 & chocolate or vanilla?


One month ago today Robert and I returned from a visit to Europe where I was entranced by the many techniques of French pattiserie.
Many of these techniques require patience and skill, something I’m not generally known for in my cooking. You want tasty food? Can do, that’s right up my alley, however if you want pretty then I generally rely on Robert’s attention to detail and steady hand to take over the reigns.
So I came back determined to learn the skills needed to create the masterpieces I saw at Pierre Herme, Laduree and Fauchon.
That is not to say this blog will only be about sweet things and complicated desserts. In fact I’ll be starting out with things I know, things like chocolate cake, cotolette & marinated fetta. I want to share with you images our vegetable and herb gardens, our family gatherings and my adventures in learning how to take photos of food.
There’s nothing like diving in the deep end, so as our literary inclined friends begin NaNoWriMo I’ll begin a 30in30 for NaBloPoMo. I know I’m insane, 1 post a day, for 30 days with a blog that hasn’t yet decided if it’s chocolate or vanilla!
I hope you’ll join me on this insane journey, I’d love to catch up with you on twitter as well, just look for me at www.twitter.com/petitdelice
One last thing before I go, can you help my blog make up it’s mind; Chocolate or vanilla?
Posted in nablopomo | Tagged , , , | Leave a comment

A little recipe to start with; Corn, bacon, cheese muffins.

Corn Bacon & Cheese Muffin

I remember very clearly the day I got given this recipe, our neighbour Paula had come around for a cuppa and she had brought a foil-wrapped plate that smelled like cheese and bacon heaven. It was enough to drag my fourteen year old self away from the basketball (I was obsessed at the time) on the television to hover expectantly at the edge of the kitchen where my Mum and Paula sat sharing cigarettes and tea.

My Mum wasn’t much of a cook (that’s  story for another post really) so baked goods that didn’t smell like they’d been on fire were a novelty.

“Don’t just stand there love,get the butter out of the fridge before these go cold” Paula always called me love, I hated it, but if she was going to bring food over, she could call me the purple people eater and I’d put up with it.

The foil was unwrapped and with the little burst of steam the golden hued muffins seemed to light up the room. (ok, I’m exaggerating a little, but when my mum baked the fire brigade was put on stand-by and these looked amazing!)

We slathered them in cold butter and devoured them and when the plate was finished Paula saw me still hovering.”Canyougivemumtherecipethosewereexcellent”
Paula looked at me, then at my mum, she too had been on the receiving end of burnt goods of doom. “How about I show you how to make them?”

It’s been 18 years since Paula showed me how to make these muffins and I’ve made a few small changes to the recipe along the way, adding corn, reducing the onion etc but now it’s time to send the recipe out into the world where I hope someone else can teach their neighbours kid how to make them.

Corn, Bacon & Cheese Muffins
Ingredients
2 full rashers of bacon, diced (approx 75 grams)
1/2 medium onion, diced (I like to use red onions but whatever’s in the cupboard is fine)
1 Egg, beaten
250ml Milk
20grams Butter, melted
270grams Self raising flour
1/2 teaspoon Salt
50 grams Grated cheese
50 grams Corn, drained

Tips: Don’t use muffin liners, these muffins like to stick to paper and so are best cooked in a greased and floured tray. Best eaten straight from the oven.

  1. Preheat oven to 220°Celsius
  2. Grease and flour a 12 cup muffin tray
  3. Fry onion and bacon over a medium heat until onion is translucent. Spread on paper towel to drain off excess fat and cool.
  4. In a large bowl mix milk, egg and butter until combined.
  5. Add remaining ingredients and mix with a fork until just combined (overbeating will make them tough)
  6. Divide mixture into your muffin tray (I’ve never tried it but I’ve heard an ice cream scoop is the ideal portion maker for this.)
  7. Bake until golden; 10-15 minutes, test with skewer and check if clean.

Enjoy!

Posted in Savoury Recipes | Tagged , , , , , , , | 1 Comment